| Version 2 (modified by , 6 months ago) ( diff ) |
|---|
Documentation / Build Instructions
This page explains how to build and run the Wedding Planner Phase P4 prototype locally.
The P4 prototype is implemented as a Flask REST application with PostgreSQL database. Since this is a prototype phase, the main scenarios are demonstrated through REST endpoints (JSON responses in browser/Postman).
Prerequisites
- Python 3.x installed
- pip installed
- PostgreSQL installed OR access to a PostgreSQL server
- (Optional) DBeaver / pgAdmin (recommended for DB management)
Project structure
The prototype is a Flask application.
Main files / folders:
- app.py - Flask entry point (server)
- requirements.txt - Python dependencies (if available)
- SQL scripts for schema + demo data loading
- (Optional) /templates and /static folders (if UI templates exist)
1. Obtain the project source code
Obtain the project source code from the repository (or download it as ZIP).
ZIP option (recommended for submission)
Create a ZIP archive containing the full project source code:
- app.py
- requirements.txt (if exists)
- SQL scripts (schema + demo dataset load scripts)
- any additional folders/files needed for running (templates/static if present)
2. Database setup (PostgreSQL)
2.1 Create database
Create a PostgreSQL database (example name):
- db_202526z_va_prj_wedding_planner2025
2.2 Create schema/tables
Run the SQL script that creates the database schema (tables, relations, constraints).
- Demo schema created:

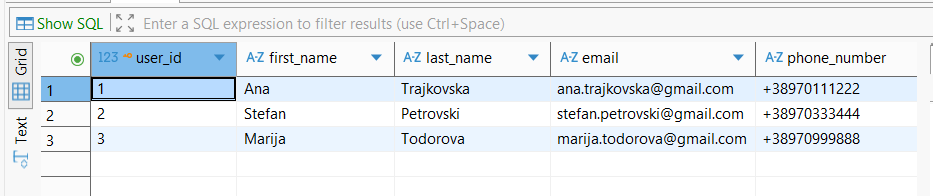
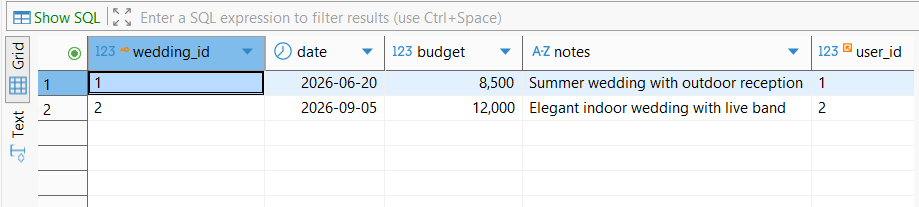
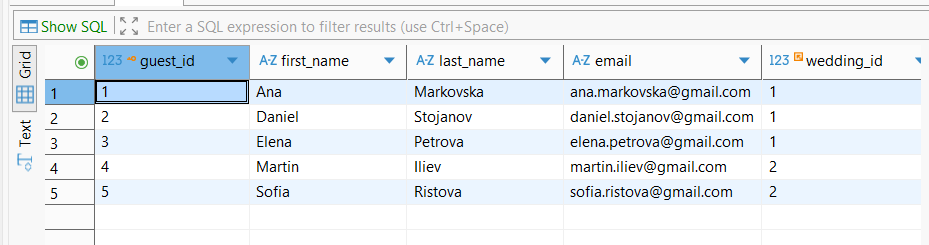
2.3 Load demo dataset
Load demo data into the database using SQL scripts (users, weddings, guests etc.).
- Demo user dataset loaded:

- Demo wedding dataset loaded:

- Demo guest dataset loaded:

3. Install Python dependencies
Open terminal in the project folder (the folder containing app.py) and execute:
pip install -r requirements.txt
If requirements.txt is missing, install the dependencies manually:
pip install flask flask_sqlalchemy psycopg2-binary
4. Configure database connection
The prototype uses PostgreSQL database.
In the configuration part (inside app.py or config file), ensure the PostgreSQL connection string/credentials are correct:
Example connection format:
postgresql://<username>:<password>@<host>:<port>/<database>
5. Run the Flask prototype
Navigate into the folder that contains app.py and run:
python app.py
If the command fails, ensure you are in the correct folder (the current directory must contain app.py).
Successful startup output example:

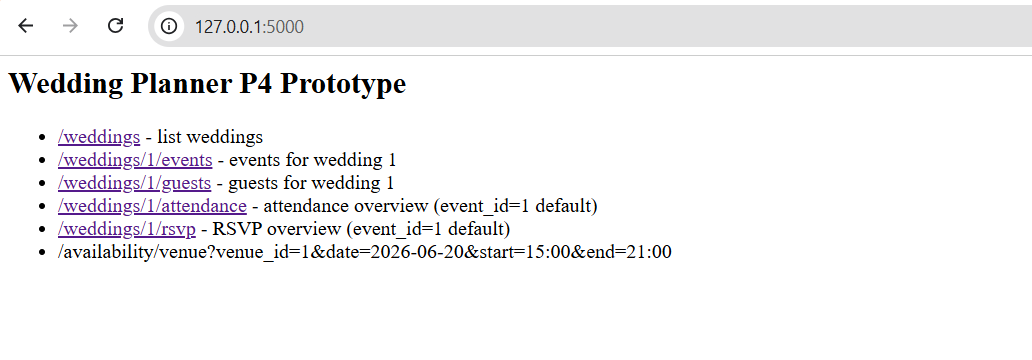
6. Access the prototype
Open the browser:
This page lists the available REST endpoints of the prototype.
- Prototype endpoints overview:
7. Available REST endpoints
The prototype provides the following endpoints:
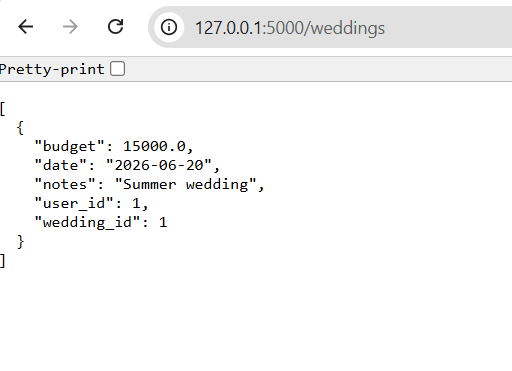
- /weddings
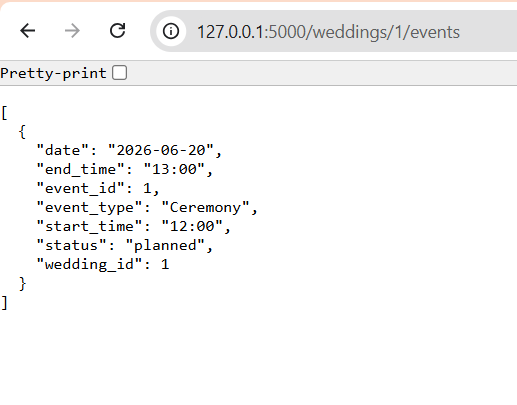
- /weddings/1/events
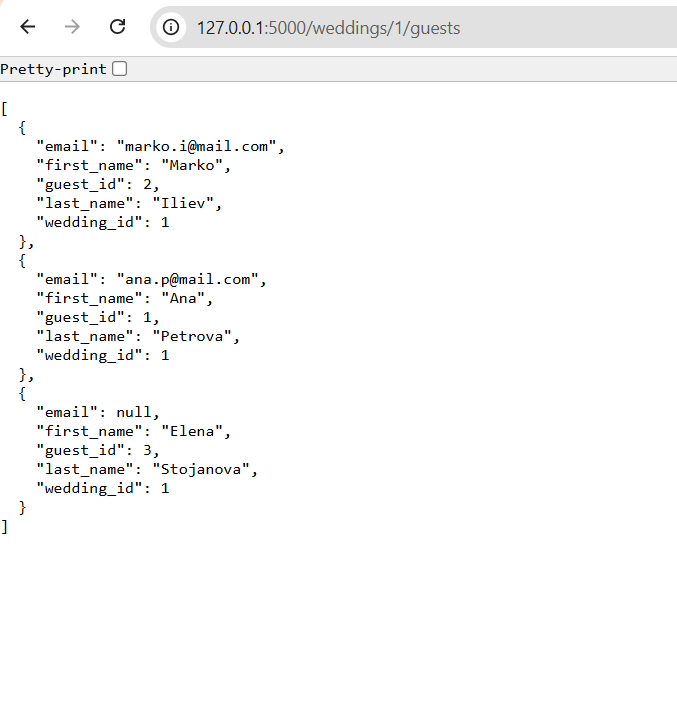
- /weddings/1/guests
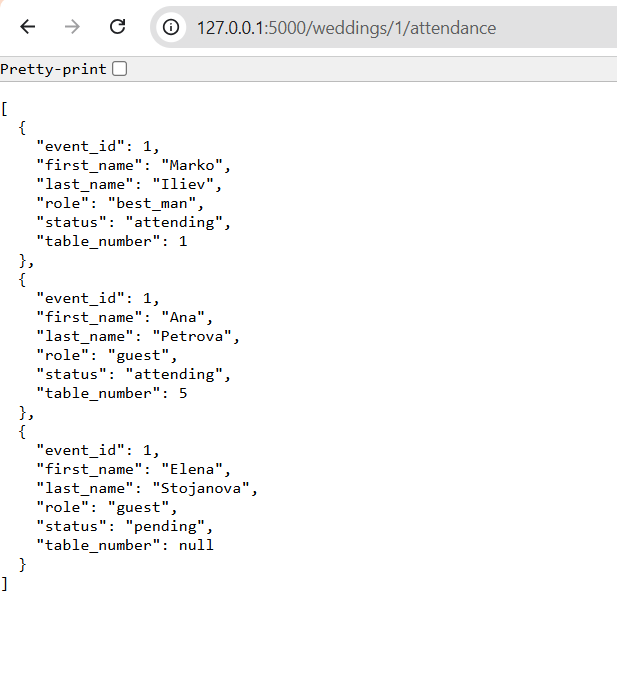
- /weddings/1/attendance
- /weddings/1/rsvp
- /availability/venue?venue_id=1&date=2026-06-20&start=15:00&end=21:00
Example screenshots:
- Weddings list:

- Events list:

- Guests list:

- Attendance overview:

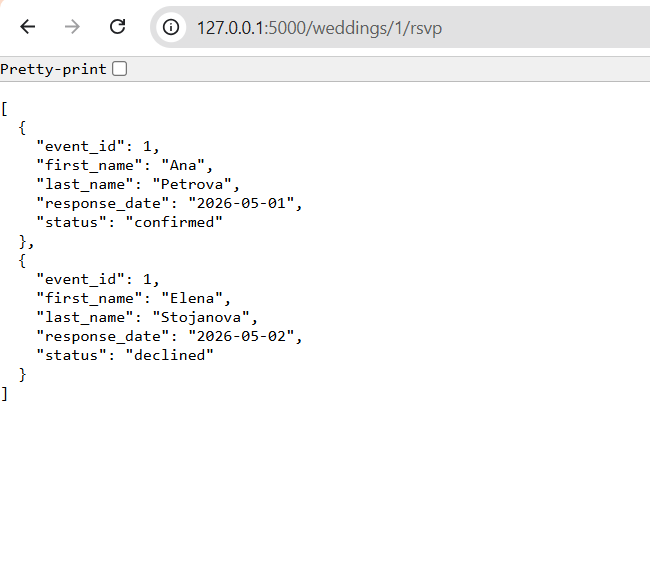
- RSVP overview:

Notes
- This is a prototype implementation for Phase P4.
- Since this is a REST-based prototype, some interactions are demonstrated through JSON responses in browser/Postman rather than a full final UI.
- Main focus of the prototype: wedding overview, guest/attendance/RSVP overview and venue availability conflict detection.
Attachments (12)
- weddings.png (13.1 KB ) - added by 6 months ago.
- events.png (15.9 KB ) - added by 6 months ago.
- guests.png (26.2 KB ) - added by 6 months ago.
- attendance.png (28.0 KB ) - added by 6 months ago.
- rsvp.png (21.2 KB ) - added by 6 months ago.
- user_data_load.png (19.5 KB ) - added by 6 months ago.
- guest_data_load.png (22.8 KB ) - added by 6 months ago.
- tables_schema_creation.png (96.9 KB ) - added by 6 months ago.
- wedding_data_load.png (18.0 KB ) - added by 6 months ago.
- wedding_planner_p4.zip (4.2 KB ) - added by 6 months ago.
- http.jpg (38.1 KB ) - added by 6 months ago.
- p4-prototype.jpg (49.0 KB ) - added by 6 months ago.
Download all attachments as: .zip